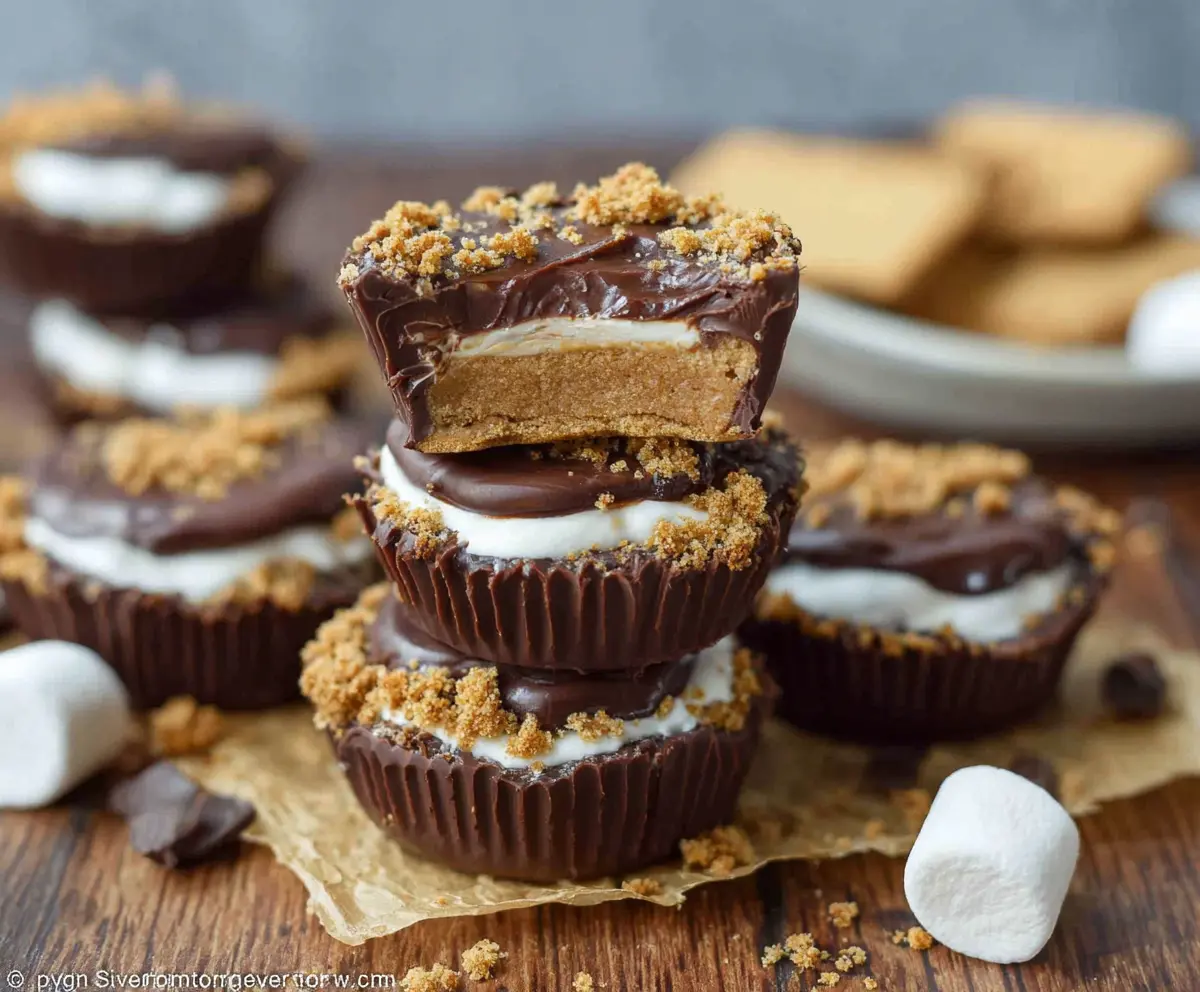
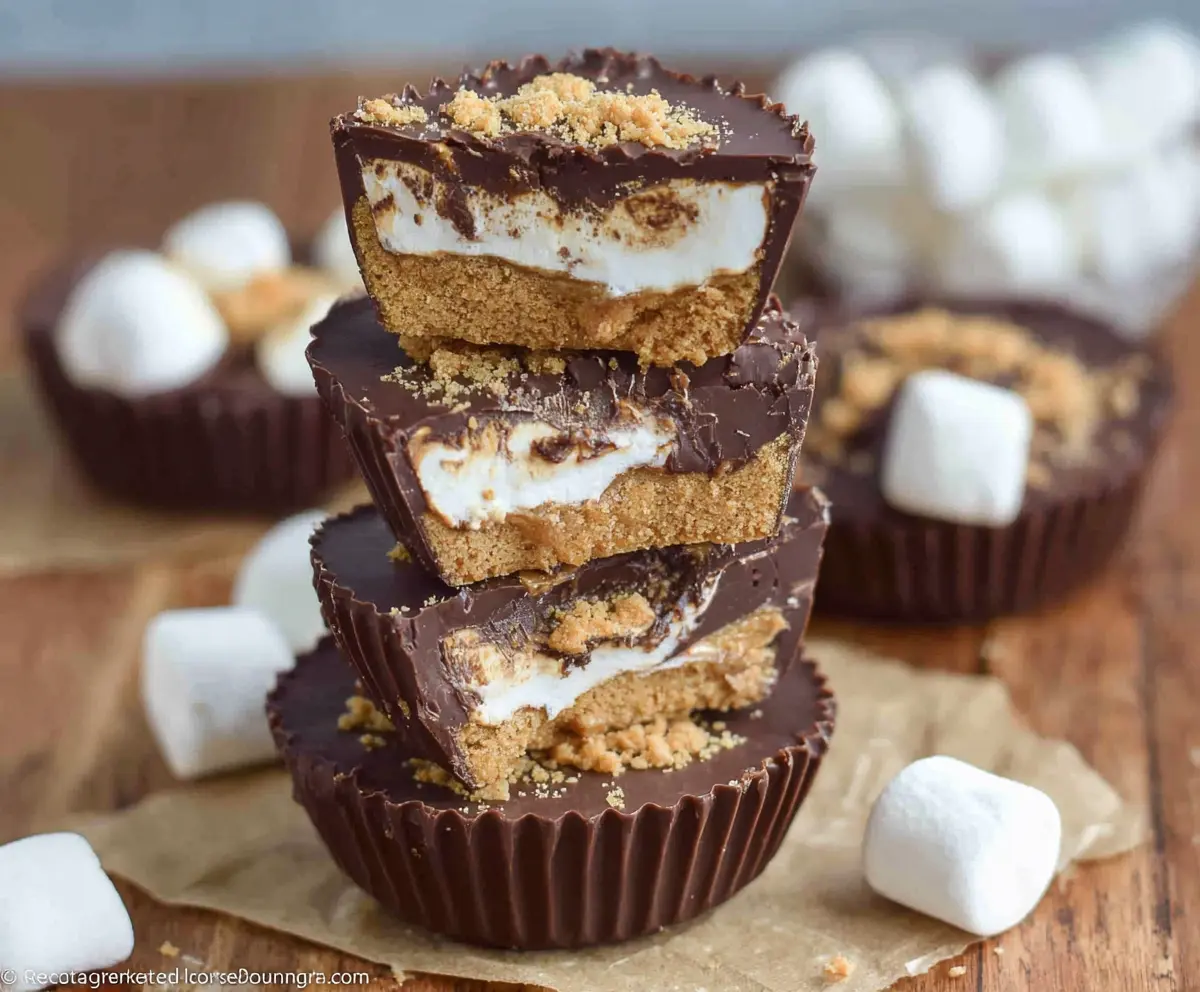
These S’mores Peanut Butter Cups are a fun treat! They bring together creamy peanut butter, sweet chocolate, and crunchy graham crackers, just like the classic campfire treat.
Honestly, who can resist chocolate and peanut butter? I love snacking on these while reminiscing about many campfire nights. They are so easy to make, and you’ll impress everyone with them!
Key Ingredients & Substitutions
Creamy Peanut Butter: This is the star of the show! You can swap it with crunchy peanut butter for extra texture or even almond butter for a nutty twist. Just ensure the consistency is similar for the filling to work well.
Unsalted Butter: You’re adding a rich creaminess here. If you’re looking for a dairy-free version, coconut oil is a great substitute. Just remember to melt it before mixing!
Semi-sweet Chocolate Chips: These are perfect for the sweet base of your cups. If you prefer dark chocolate, go for it! If you want something less sweet, use a good quality dark chocolate instead. White chocolate could also be a fun choice!
Marshmallows: Mini marshmallows fit perfectly in these, but if you can only find large ones, cut them up! For a vegan option, check out plant-based marshmallows available at stores.
Graham Crackers: They add that nostalgic crunch! If you need a gluten-free option, use gluten-free graham crackers or crushed nuts for a similar effect.
How Can I Ensure My Chocolate Melts Smoothly?
Melting chocolate can be tricky, but there are some simple tricks to make it smooth and creamy for your cups.
- Low and slow: Always melt chocolate in short bursts (30 seconds), stirring well each time. This helps prevent burning.
- Add a little fat: Using coconut or vegetable oil helps the chocolate melt smoothly and gives it a nice glossy finish.
- Use a microwave-safe bowl: Make sure your bowl is suitable for the microwave; glass or ceramic works best.
- Let it cool slightly: If your chocolate gets too hot, it can seize up. Let it cool for a minute before using.
Following these tips will make sure your melted chocolate is perfect for your yummy S’mores Peanut Butter Cups! Enjoy making them!
How to Make S’mores Peanut Butter Cups
Ingredients You’ll Need:
For the Peanut Butter Filling:
- 1 cup creamy peanut butter
- 1/4 cup unsalted butter, softened
- 1/4 cup powdered sugar
- 1/2 teaspoon vanilla extract
For the Chocolate Layers:
- 2 cups semi-sweet chocolate chips
- 1 tablespoon coconut oil or vegetable oil (optional, for smoother melting)
For the Assembly:
- 1 cup mini marshmallows or large marshmallows cut to size
- 1/2 cup graham crackers, finely crushed (for topping)
How Much Time Will You Need?
This delightful recipe requires about 20 minutes of prep time, plus an additional 30 minutes to chill in the freezer. It’s quick and easy to create, making it a perfect treat for any occasion!
Step-by-Step Instructions:
1. Prepare the Muffin Tin:
First, grab a standard muffin tin and line it with paper liners. This will form about 12 cups to hold your delicious creations!
2. Make the Peanut Butter Filling:
In a medium bowl, mix the creamy peanut butter, softened butter, powdered sugar, and vanilla extract. Stir until everything is smooth and well combined. This yummy mixture will be your filling.
3. Melt the Chocolate:
Now, take a microwave-safe bowl and add 1 cup of chocolate chips along with the coconut or vegetable oil (if using). Melt the chocolate in the microwave in 30-second intervals, stirring in between each interval until smooth.
4. Chocolate Base Layer:
Take about 1 tablespoon of the melted chocolate and spoon it into the bottom of each lined muffin cup. Tilt the pan slightly to spread the chocolate evenly across the bottom. This is your base layer!
5. Chill the Base:
Now, pop the muffin tin in the freezer for about 10 minutes to let the chocolate set. This helps create a nice solid base for your cups.
6. Add the Peanut Butter Mixture:
Once set, take the muffin tin out of the freezer. Add about 1 tablespoon of the peanut butter filling on top of the set chocolate layer in each cup. Gently press down to flatten it a bit.
7. Add the Marshmallows:
Next, place a mini marshmallow (or a cut piece of a large marshmallow) on top of the peanut butter layer in each cup.
8. Top with More Chocolate:
Melt the remaining 1 cup of chocolate chips as you did before. Then, spoon this melted chocolate over the marshmallow to cover it completely.
9. Garnish with Graham Crackers:
While the chocolate is still warm, sprinkle the finely crushed graham crackers on top as a delicious garnish!
10. Final Chill:
Return the muffin tin to the freezer for at least 20 minutes, or until all layers are firm. This is the hardest part—waiting!
11. Enjoy!
Once the cups are set, remove them from the muffin liners and store in an airtight container in the refrigerator. Enjoy your delicious S’mores Peanut Butter Cups with family and friends!
Dig in and savor the layers of chocolate, peanut butter, marshmallow, and that delightful crunch of graham crackers. Perfect for any occasion!
Can I Use Natural Peanut Butter Instead of Creamy Peanut Butter?
Yes! You can use natural peanut butter, but keep in mind it might be a bit runnier. You may need to adjust the amount of powdered sugar to achieve the desired consistency for the filling.
How Should I Store the S’mores Peanut Butter Cups?
Store them in an airtight container in the refrigerator. They will keep well for up to a week! Just allow them to come to room temperature for a few minutes before enjoying for the best texture.
Can I Make These Ahead of Time?
Absolutely! You can make these S’mores Peanut Butter Cups a day or two in advance. Just keep them stored in the refrigerator until you’re ready to serve them.
What if I Don’t Have Graham Crackers?
If you don’t have graham crackers, you can substitute them with crushed cookies like Digestives or Vanilla Wafers. Alternatively, you can use finely chopped nuts for a different texture!