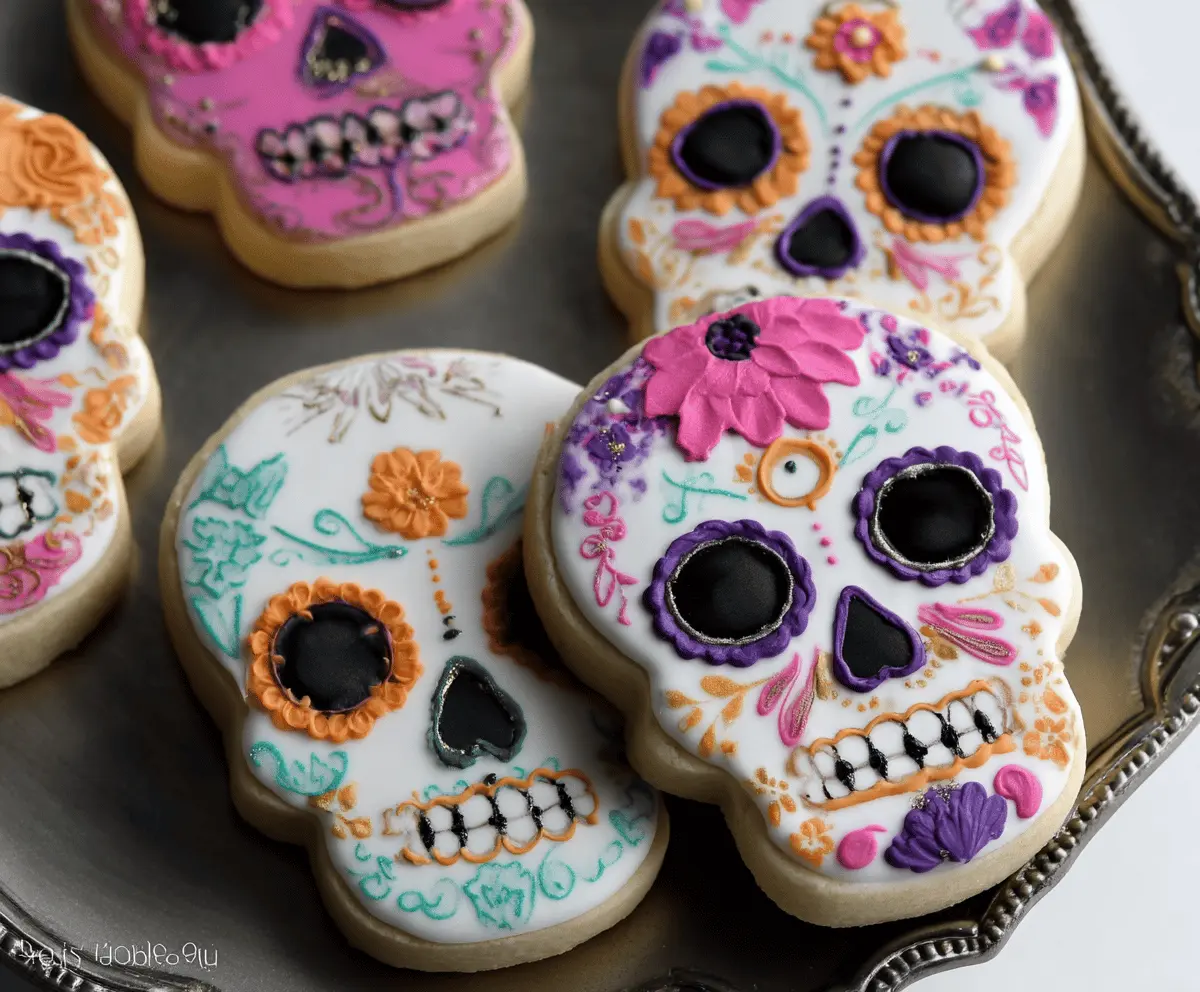
These Skull Sugar Cookies are a fun treat, perfect for Halloween! They are soft, sweet, and decorated to look like cute little skulls. Kids (and adults!) will love them!
When making these cookies, I always have a blast decorating them with colorful icing. Trust me, the more sprinkles, the better! Plus, they make great snacks for a spooky party! 🎃
Key Ingredients & Substitutions
All-Purpose Flour: This is the base for your cookies. If you’re looking for a gluten-free option, try a 1:1 gluten-free flour blend. It works pretty well and should keep the cookies soft!
Butter: Unsalted butter is best for sweet cookies. If you’re in a pinch, margarine or coconut oil can also work, though it may alter the flavor slightly. Just make sure whatever you use is softened for easy mixing!
Granulated Sugar: Regular sugar adds sweetness and helps with the cookie’s structure. Brown sugar can be used for a richer flavor but will give a different texture. Some people like combining the two for a good balance!
Royal Icing: Meringue powder gives royal icing its structure. If you can’t find it, you can use egg whites instead, but be cautious if you’re serving the cookies to those with allergies. Store-bought icing can also save time!
How Do I Achieve Perfectly Decorated Cookies?
Decorating these Skull Sugar Cookies is fun but can be challenging. Here’s how to make it easier:
- Thickness Matters: Roll the dough to about 1/4 inch thick. Too thin will result in crispy cookies, while too thick might not hold the design well.
- Chilling Is Key: Chilling your dough prevents spreading in the oven. Don’t skip this step! 1 hour is usually enough, but if it’s a warm day, a bit longer can help.
- Royal Icing Consistency: For outlining, it should be thick enough to hold shape but still pipeable. For flooding, thin it slightly with water until it runs like honey. Practice a bit on parchment paper if needed!
- Dry Time: After you apply the base coat, be patient and let it dry completely. This will allow you to add details without smudging the base layer.
Every step is crucial for getting those beautiful, eye-catching cookies that are great for any festive occasion!

How to Create Delicious Skull Sugar Cookies
Ingredients You’ll Need:
For the Sugar Cookies:
- 2 3/4 cups all-purpose flour
- 1 teaspoon baking powder
- 1/2 teaspoon salt
- 1 cup unsalted butter, softened
- 1 1/2 cups granulated sugar
- 1 large egg
- 2 teaspoons vanilla extract
- 1/2 teaspoon almond extract (optional)
For the Royal Icing:
- 4 cups powdered sugar, sifted
- 3 tablespoons meringue powder
- 9-10 tablespoons warm water
- Gel food coloring in various colors (e.g., purple, pink, blue, white, orange, black)
- Edible gold or metallic edible paint or luster dust (optional, for detailing)
How Much Time Will You Need?
This delightful Skull Sugar Cookies recipe takes about 20 minutes to prepare, plus 1 hour to chill the dough, and around 12 minutes to bake. Don’t forget the drying time! After decorating, you’ll want to let the icing set completely, which can take 4–6 hours or even overnight for the best results.
Step-by-Step Instructions:
1. Make the Sugar Cookie Dough:
In a medium bowl, whisk together the flour, baking powder, and salt; set aside. In a large bowl, using an electric mixer, beat the softened butter and granulated sugar together until it’s light and fluffy. Next, add the egg, vanilla extract, and optional almond extract, mixing well. Gradually incorporate the dry ingredients until everything is combined into a dough.
2. Chill the Dough:
Divide the cookie dough into two discs. Wrap each one in plastic wrap and place them in the refrigerator for at least 1 hour. Chilling is important to prevent the cookies from spreading while baking!
3. Preheat the Oven and Prepare Baking Sheets:
Once the dough has chilled, preheat your oven to 350°F (175°C) and line your baking sheets with parchment paper to keep the cookies from sticking.
4. Roll and Cut the Cookies:
On a lightly floured surface, roll out one disc of dough to about 1/4 inch thick. Use a skull-shaped cookie cutter to cut out shapes, carefully transferring them to the prepared baking sheets, leaving about 1 inch of space between each cookie.
5. Bake:
Bake the cookies for 10 to 12 minutes, until the edges start to turn golden. Let the cookies cool on the baking sheets for about 5 minutes before moving them to a wire rack to cool completely.
6. Prepare the Royal Icing:
In a large bowl, combine the sifted powdered sugar and meringue powder. Add 9 tablespoons of warm water and mix with an electric mixer on low speed until combined. Increase the speed to high and continue mixing until you achieve stiff peaks, which should take around 5 minutes. You can adjust the consistency by adding more water or powdered sugar as needed.
7. Color the Icing:
Divide the royal icing into several bowls. Add gel food coloring to each bowl to create your desired colors like purple, pink, blue, white, orange, and black. Cover them snugly with plastic wrap to prevent drying.
8. Base Coat the Cookies:
Using a piping bag or a simple spoon, ice the top of each cookie with a smooth layer of colored royal icing. You can pick colors like pink, purple, blue, or white as a base. Use a toothpick or a scribe tool to help spread it evenly. Allow this base layer to dry completely, which can take about 4 to 6 hours, or even overnight for best results.
9. Add Details:
Once the base layer is dry, it’s time to add fun details! Thin some royal icing with water to pipe finer designs, such as floral patterns and features like the eyes, nose, and teeth outlines. Black icing works beautifully for the eye sockets and noses!
10. Optional Metallic Detailing:
When the icing is fully dry, grab a fine brush and use edible gold or metallic paint to add lavish designs reminiscent of sugar skulls. This is where you can let your creativity shine!
11. Let Dry Completely:
Give your decorated cookies plenty of time to dry completely before stacking or storing them in an airtight container. This ensures that the decorations stay intact!
Enjoy your beautifully decorated Skull Sugar Cookies, perfect for Día de los Muertos, Halloween, or any festive occasion! Happy baking!

Can I Use Different Extracts for Flavoring?
Absolutely! While vanilla and almond extracts are commonly used, feel free to experiment with other extracts like lemon or coconut for different flavor profiles. Just keep the total amount of extract around 2 teaspoons to avoid overpowering the dough.
What Can I Substitute for Meringue Powder in Royal Icing?
If you don’t have meringue powder, egg whites can be a substitute! Use 2 egg whites for every 1 tablespoon of meringue powder. Just remember to whisk them until they are frothy, and be cautious if serving to those with egg allergies.
How Should I Store the Finished Cookies?
Store the decorated cookies in an airtight container at room temperature for up to a week. If you need to store them longer, you can freeze them before decorating. Just let them thaw completely before adding icing!
Can I Make the Dough Ahead of Time?
Yes, you can! Prepare and chill the dough in advance, then wrap it tightly in plastic wrap and store it in the refrigerator for up to 3 days. Alternatively, you can freeze the wrapped dough for up to 2 months; just let it thaw in the fridge before rolling and cutting.


