If you’re looking for a hearty meal that feels like a warm hug, meatloaf is often the answer. I love how many ways you can prepare this classic dish, making it perfect for any dinner table.
Today, I’m sharing four of my favorite meatloaf recipes that are easy to make and full of good taste. You’ll find options for different dietary needs and fun ways to serve it, so let’s get cooking!
Jump to Recipe:
Simple Keto Meatloaf Recipe
This keto meatloaf recipe keeps carbs low without losing any of the rich taste you expect. It’s a great choice for those following a low-carb lifestyle who still want a satisfying family meal.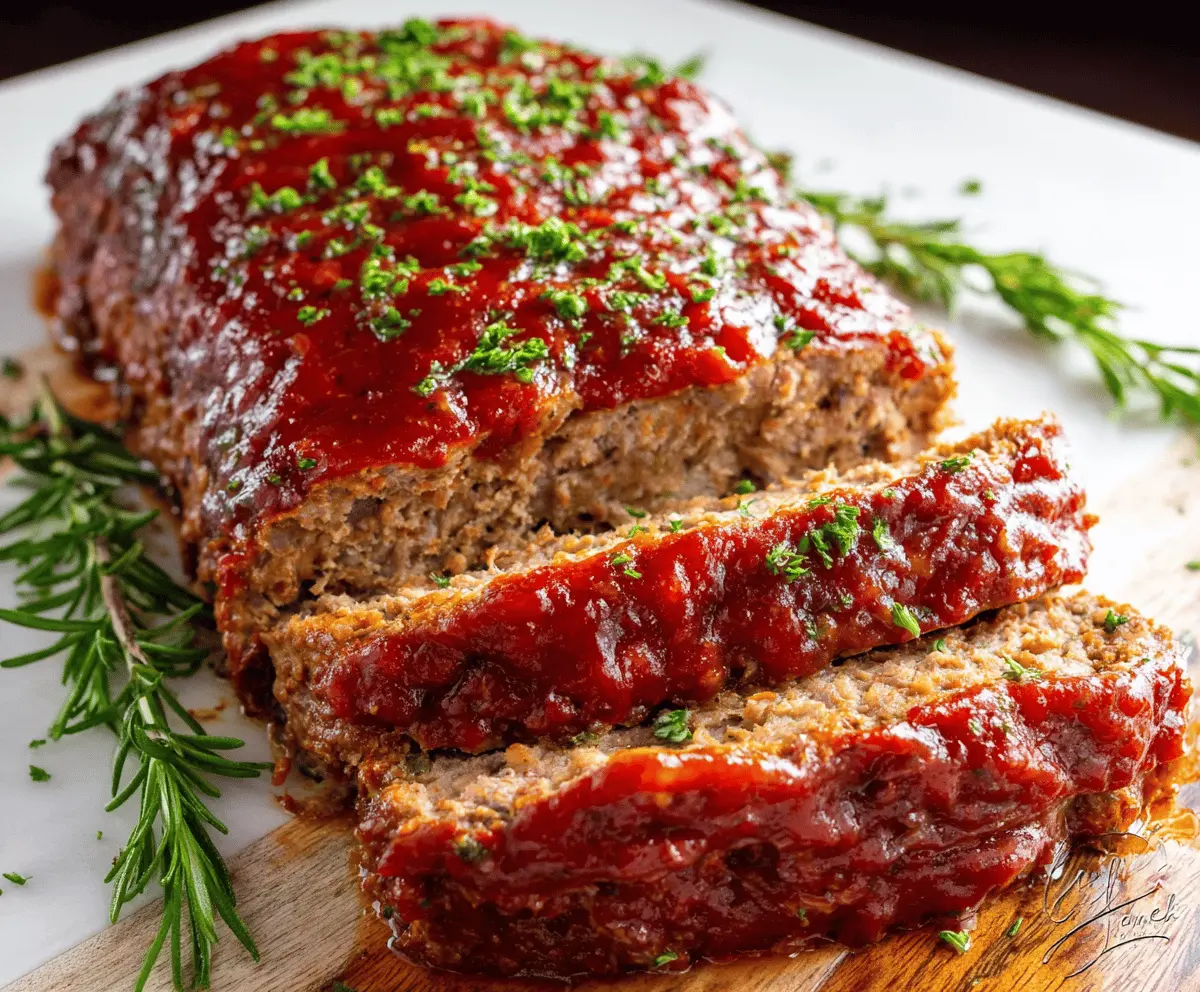
Key Ingredients & Tips for Keto Meatloaf
- Ground Beef (80/20): Using beef with good fat content adds moisture and taste, which is helpful in keto cooking.
- Almond Flour: This is your low-carb binder. It helps hold the meatloaf together without adding many carbs.
- Sugar-Free Ketchup: For that classic meatloaf glaze, make sure to pick a sugar-free option to keep it keto-friendly.
What You Need for Keto Meatloaf
- 2 lbs ground beef (80/20)
- 1/2 cup almond flour
- 1/4 cup chopped onion
- 1 egg
- 2 cloves garlic, minced
- 1 tbsp Worcestershire sauce (check for low-carb if strict)
- Salt and pepper to taste
- For the glaze: 1/2 cup sugar-free ketchup, 1 tbsp apple cider vinegar, 1 tsp mustard powder
⏱️ Time: 1 hour 15 mins🍽️ Yields: 6-8 servings
How to Make Keto Meatloaf
Step 1: Get Ready
Preheat your oven to 350°F (175°C). Lightly grease a loaf pan so your meatloaf won’t stick.
Step 2: Mix It Up
In a large bowl, combine the ground beef, almond flour, chopped onion, egg, minced garlic, Worcestershire sauce, salt, and pepper. Mix everything well with your hands until it’s just combined. Try not to overmix it.
Step 3: Shape and Bake
Press the meat mixture evenly into the prepared loaf pan. In a small bowl, whisk together the sugar-free ketchup, apple cider vinegar, and mustard powder for the glaze. Spread about half of this glaze over the top of your meatloaf. Bake for 45 minutes.
Step 4: Finish Baking
Take the meatloaf out of the oven, spread the rest of the glaze on top, and put it back in the oven for another 15-20 minutes. It should be cooked through and nicely browned on top. Let it rest for 10 minutes before you slice it.
📝 Final Note
Resting the meatloaf before you slice it is important. This helps it hold its shape better and keeps all the good juices inside, making each slice taste better.
Fun Meatloaf Sliders Recipe
These mini meatloaf sliders are perfect for parties or a fun weeknight dinner. They are easy to hold and pack all the classic meatloaf taste into a small bite.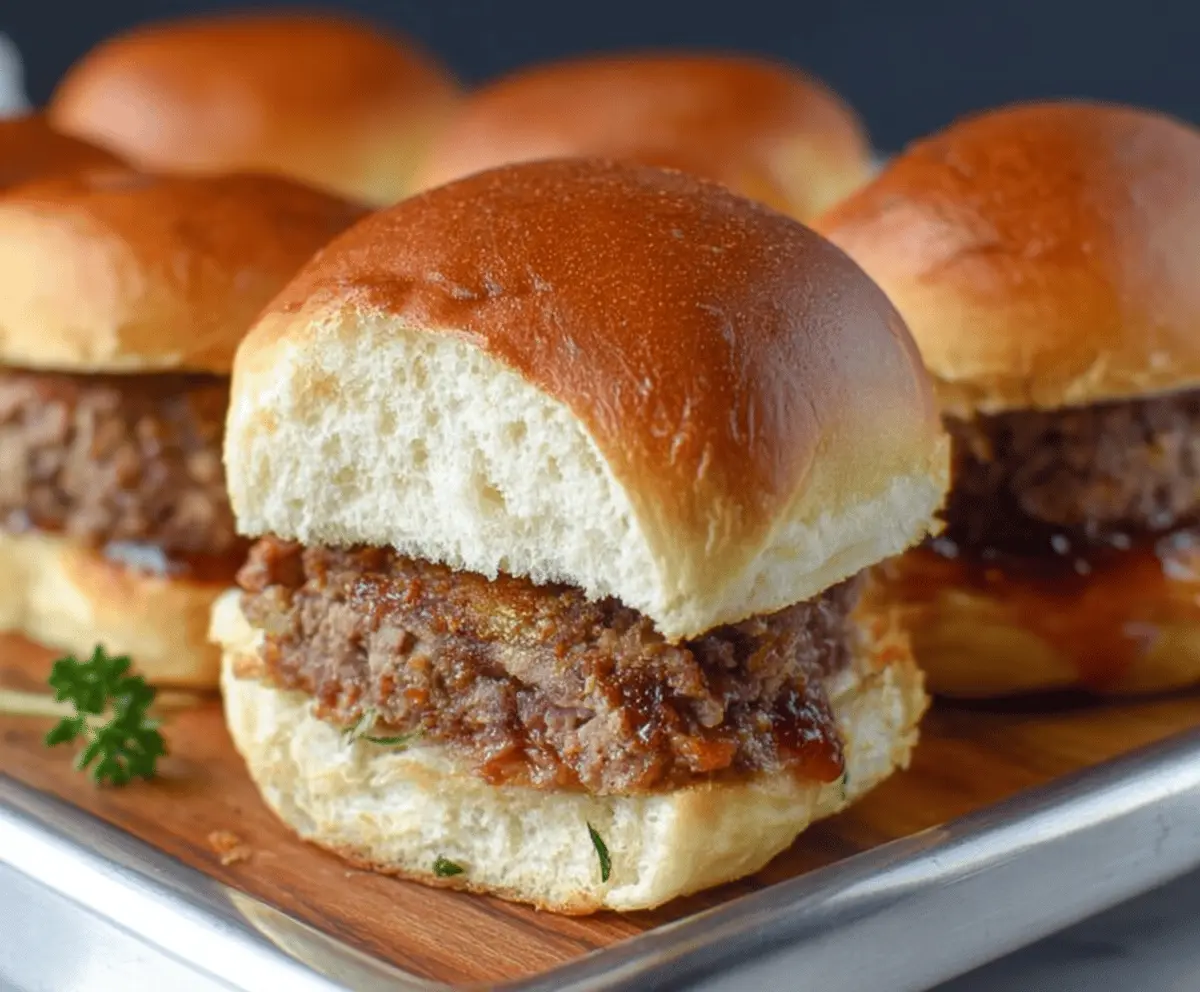
Key Ingredients & Tips for Meatloaf Sliders
- Slider Buns: Soft brioche buns work wonderfully for these small sandwiches, offering a nice texture with the meatloaf.
- Mini Patties: Make sure your meatloaf patties are flat and sized just right so they fit perfectly on the slider buns.
- Cheese Slice: A small slice of cheddar or provolone on top makes these sliders extra cheesy and appealing.
What You Need for Meatloaf Sliders
- 1.5 lbs ground beef
- 1/2 cup breadcrumbs
- 1/4 cup milk
- 1 egg
- 1/4 cup chopped onion
- 1 tbsp ketchup
- 1 tsp mustard
- Salt and pepper to taste
- 12 slider buns
- 12 small slices cheddar cheese
- Optional toppings: pickles, extra ketchup
⏱️ Time: 45 mins🍽️ Yields: 12 sliders
How to Make Meatloaf Sliders
Step 1: Prep the Meatloaf Mix
Preheat your oven to 375°F (190°C). In a big bowl, gently combine the ground beef, breadcrumbs, milk, egg, chopped onion, ketchup, mustard, salt, and pepper. Mix until everything is just combined.
Step 2: Form Small Patties
Divide the meatloaf mixture into 12 equal parts. Shape each part into a small, flat patty that will fit well on your slider buns. Place these patties on a baking sheet.
Step 3: Bake and Assemble
Bake the patties for 18-20 minutes, or until they are cooked through. In the last 5 minutes of baking, place a small slice of cheese on top of each patty to let it melt nicely. Serve them hot on slider buns with any toppings you like, such as pickles or extra ketchup.
📝 Final Note
For a super easy cleanup, line your baking sheet with parchment paper before you put the patties down. This helps prevent sticking and makes washing up simpler.
Easy Muffin Tin Meatloaf Portions
Making meatloaf in a muffin tin is a clever way to get perfectly portioned servings every time. These individual meatloaf cups cook faster and are great for meal prepping.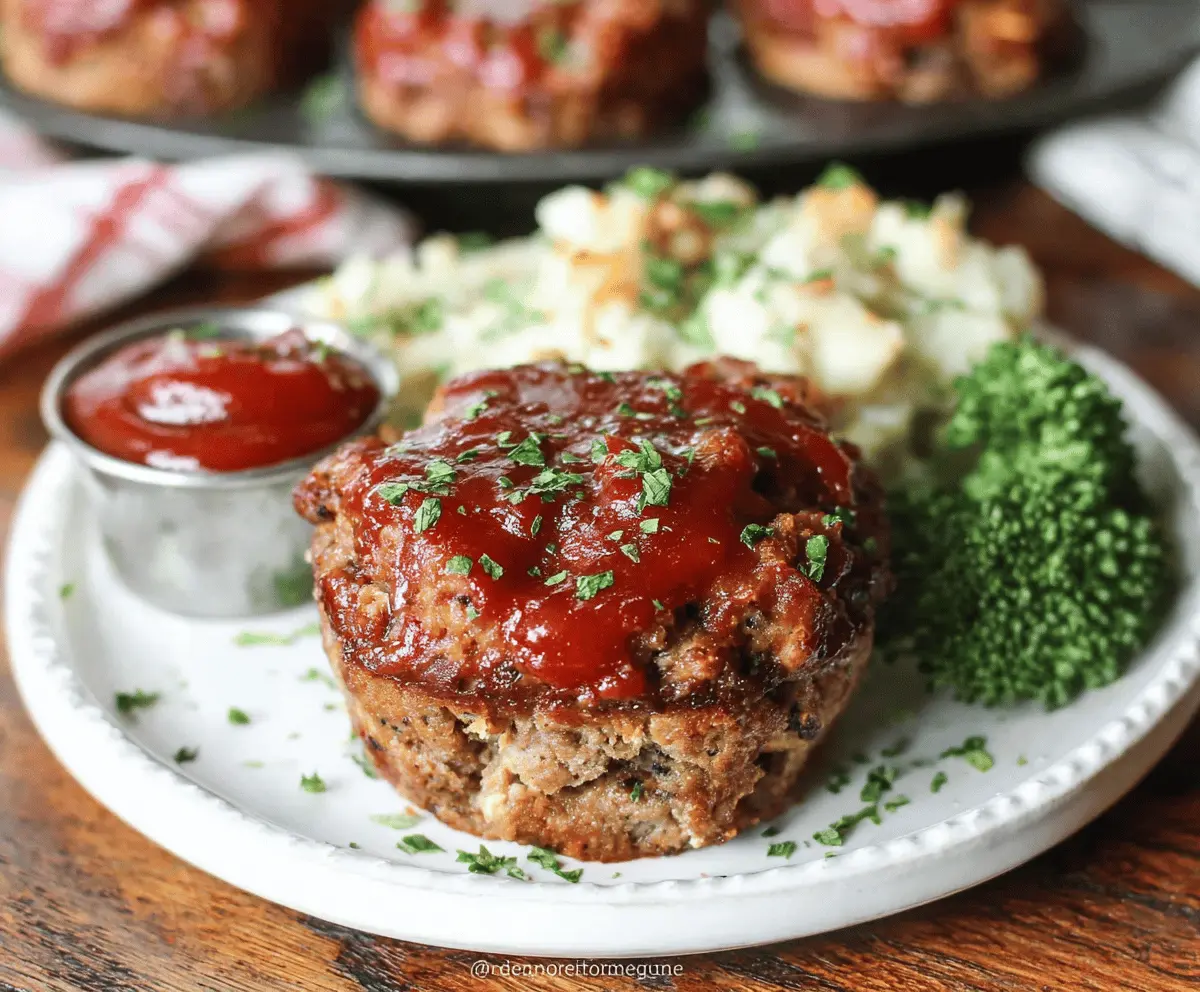
Key Ingredients & Tips for Muffin Tin Meatloaf
- Muffin Pan: A standard 12-cup muffin tin is what you need for these individual meatloaves.
- Even Portions: Try to divide your meatloaf mixture as evenly as you can among the cups. This helps them all cook at the same speed.
- Ketchup Glaze: A simple, sweet ketchup glaze on top makes these mini meatloaves extra appealing and adds a nice finish.
What You Need for Muffin Tin Meatloaf
- 1.5 lbs ground beef
- 1/2 cup breadcrumbs
- 1/4 cup milk
- 1 egg
- 1/4 cup finely chopped bell pepper
- 1 tbsp Worcestershire sauce
- Salt and pepper to taste
- For the glaze: 1/2 cup ketchup, 1 tbsp brown sugar, 1 tsp apple cider vinegar
⏱️ Time: 40 mins🍽️ Yields: 12 mini meatloaves
How to Make Muffin Tin Meatloaf
Step 1: Get the Oven Ready
Preheat your oven to 375°F (190°C). Lightly grease a 12-cup muffin tin. This will help your meatloaves come out easily.
Step 2: Mix the Meatloaf
In a large bowl, gently combine the ground beef, breadcrumbs, milk, egg, finely chopped bell pepper, Worcestershire sauce, salt, and pepper. Mix until everything is just combined.
Step 3: Fill the Muffin Tins
Divide the meatloaf mixture evenly among the 12 muffin cups. Fill each cup almost to the top.
Step 4: Glaze and Bake
In a small bowl, mix together the ketchup, brown sugar, and apple cider vinegar for your glaze. Spoon about a teaspoon of this glaze over the top of each meatloaf cup. Bake for 25-30 minutes, or until they are cooked through. Let them sit for a few minutes before removing them from the muffin tin.
📝 Final Note
These mini meatloaves are great for making ahead! Once they’ve cooled down, you can wrap them individually and freeze them. This makes for quick and easy meals later.
Hearty Philly Cheesesteak Meatloaf
This Philly cheesesteak meatloaf brings the rich taste of a classic sandwich into a comforting meatloaf form. It’s packed with peppers, onions, and lots of melted cheese on top.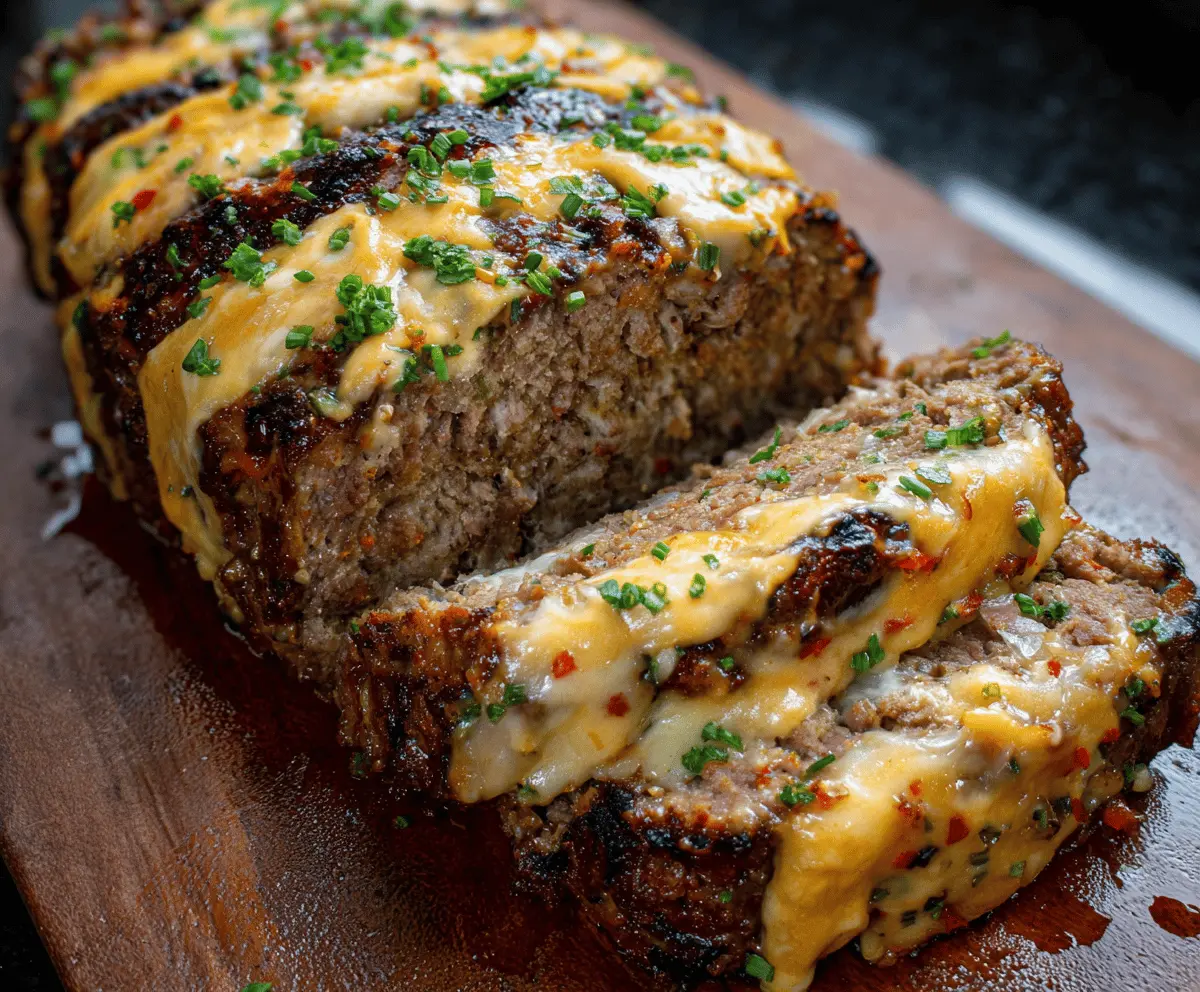
Key Ingredients & Tips for Philly Cheesesteak Meatloaf
- Provolone Cheese: This cheese is key to getting that true Philly cheesesteak taste. Lay slices over the hot meatloaf.
- Bell Peppers & Onions: Cooking these veggies first makes them softer and brings out a deeper, sweeter taste in your meatloaf.
- Worcestershire Sauce: A small amount goes a long way to add a rich, deep taste to the meat.
What You Need for Philly Cheesesteak Meatloaf
- 2 lbs ground beef
- 1 green bell pepper, chopped
- 1 onion, chopped
- 2 cloves garlic, minced
- 1 cup breadcrumbs
- 1 egg
- 1/4 cup milk
- 2 tbsp Worcestershire sauce
- Salt and pepper to taste
- 6-8 slices provolone cheese
⏱️ Time: 1 hour 25 mins🍽️ Yields: 6-8 servings
How to Make Philly Cheesesteak Meatloaf
Step 1: Prep the Veggies
Preheat your oven to 350°F (175°C). In a skillet, cook the chopped bell pepper and onion until they are soft, which usually takes about 5-7 minutes. Add the minced garlic and cook for just 1 more minute. Let these veggies cool down a bit before you mix them.
Step 2: Mix Everything Together
In a large bowl, combine the ground beef, the cooled bell pepper and onion mix, breadcrumbs, egg, milk, Worcestershire sauce, salt, and pepper. Mix gently until everything is just combined.
Step 3: Form Loaf and Bake
Press the meat mixture into a loaf pan or shape it into a nice loaf directly on a baking sheet. Bake for 50 minutes.
Step 4: Add Cheese and Finish
Take the meatloaf out of the oven. Place slices of provolone cheese evenly over the top. Return it to the oven and bake for another 10-15 minutes, or until the cheese is beautifully melted and bubbly, and the meatloaf is fully cooked. Let it rest for 10 minutes before you slice it to serve.
📝 Final Note
For a little extra golden brown on the cheese, you can broil it for the last minute. Just be sure to watch it very closely so it doesn’t burn quickly!