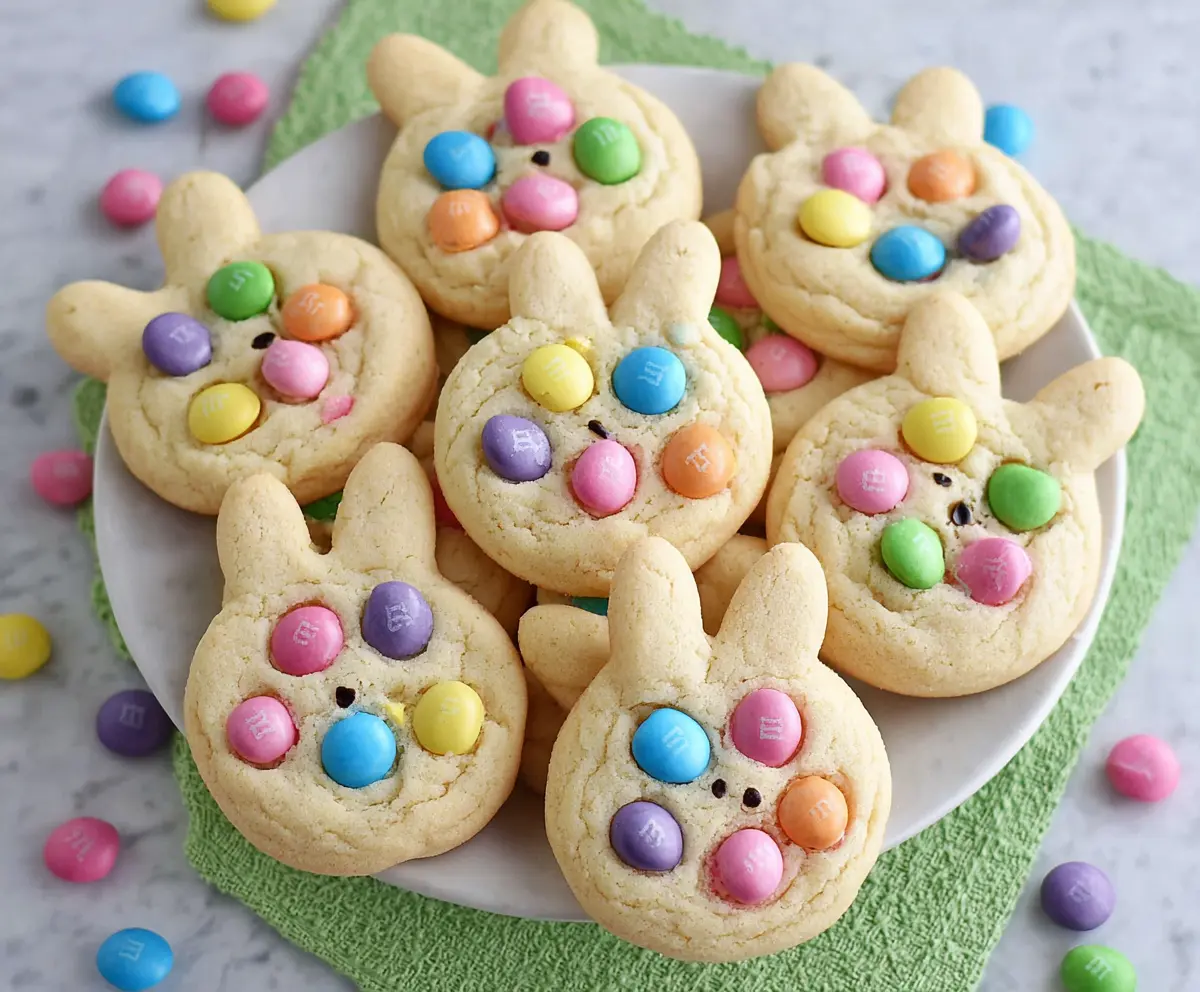
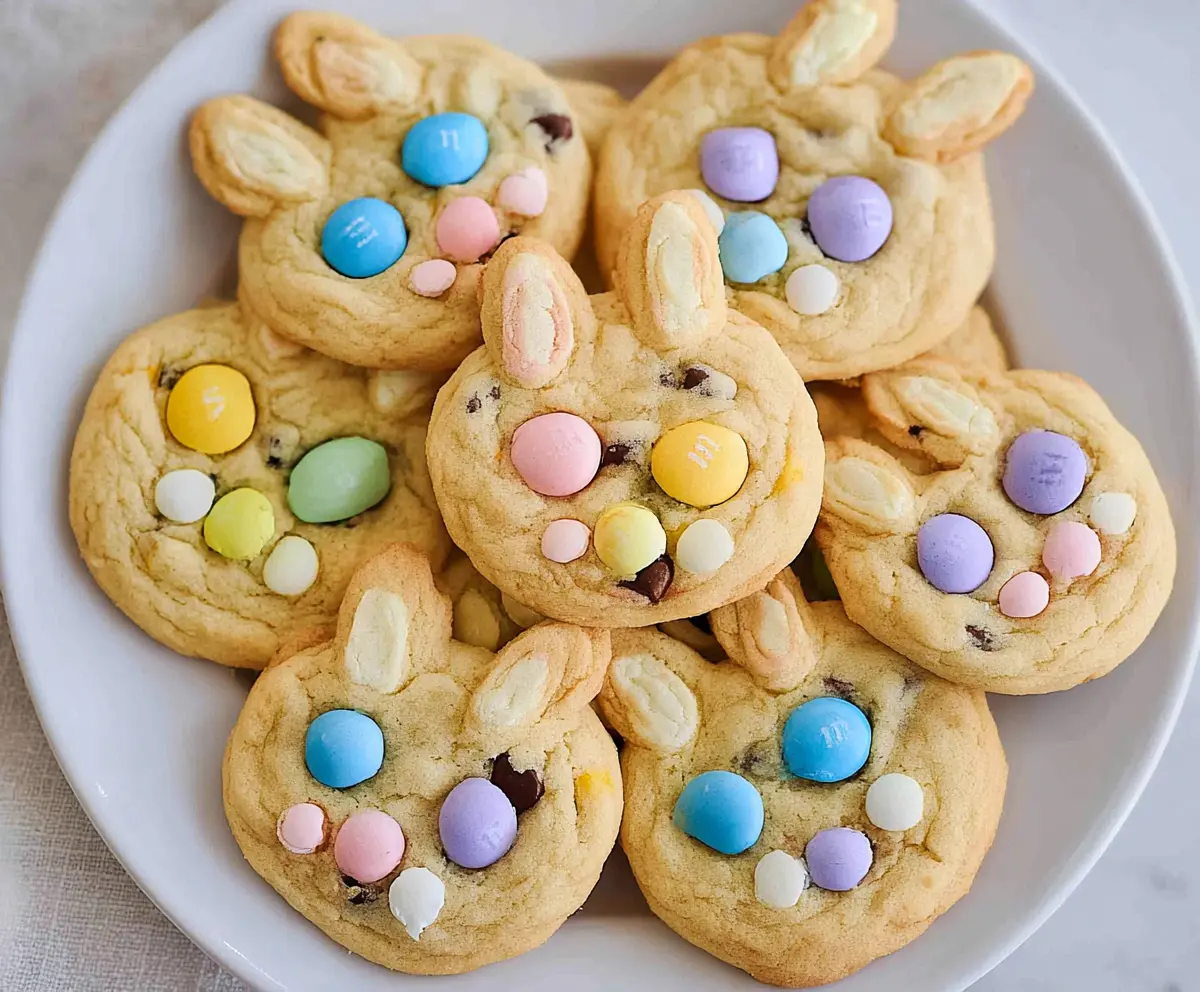
These Easter Bunny M&M’s Cookies are fun, colorful, and perfect for the holiday! Soft and chewy, each cookie is filled with chocolatey M&M’s that add a joyful crunch.
Baking these cookies always puts a smile on my face! Plus, I love how they disappear quickly when friends come over. Keep a few for yourself, or share the cheer! 🐰🍪
Key Ingredients & Substitutions
Unsalted butter: This is key for that rich cookie flavor. If you’re dairy-free, try using coconut oil or vegan butter as a substitute. The texture might vary slightly, but the taste will still be wonderful!
Sugars: The combo of granulated and powdered sugar gives these cookies a nice texture. You can substitute brown sugar for granulated sugar for a hint of molasses flavor. However, this could make the cookies a bit chewier.
Eggs: They help bind the dough. If you’re vegan or allergic, use flaxseed meal; mix 1 tablespoon of flaxseed with 2.5 tablespoons of water and let it sit for 5 minutes until it thickens.
M&M’s: While assorted colors are fun, you can also use chocolate chips or mini eggs if M&M’s aren’t available. Just keep in mind this will change the cookie appearance!
Black edible marker or icing gel: These are great for little details. If you don’t have them, chocolate chips or other small candies can also be pressed on for bunny noses!
How Do I Shape Bunny Cookies Perfectly?
Shaping the cookies into bunny heads can be tricky, but with a little patience, you’ll nail it! Start by rolling the dough into a round ball for the head. Then, pinch off two smaller pieces for the ears and attach them to the top.
- Use your fingers to mold the ears into the desired shape, elongating them slightly.
- Place the shaped dough on the baking sheet and gently press down to flatten them slightly.
- As you decorate, think about where the M&M’s go to make fun eyes and a cute nose!
Don’t worry if they don’t look perfect. These cookies are all about fun and creativity. Have a good time with it!
How to Make Easter Bunny M&M’s Cookies
Ingredients You’ll Need:
For the Cookie Dough:
- 1 cup unsalted butter, softened
- 1 cup granulated sugar
- 1/2 cup powdered sugar
- 2 large eggs
- 2 teaspoons vanilla extract
- 3 cups all-purpose flour
- 1/2 teaspoon baking powder
- 1/2 teaspoon baking soda
- 1/2 teaspoon salt
- 1 1/2 cups M&M’s, assorted colors (plus extra for decorating)
For Decoration:
- Black edible marker or black icing gel (for bunny nose details)
How Much Time Will You Need?
This delightful cookie recipe takes about 20 minutes to prep and another 10-12 minutes to bake. Allow some additional time for cooling before serving. Total time: About 40 minutes!
Step-by-Step Instructions:
1. Prepping the Oven and Baking Sheets:
First, preheat your oven to 350°F (175°C). While that’s heating up, line your baking sheets with parchment paper to prevent the cookies from sticking. This makes cleanup easier too!
2. Creaming the Butters and Sugars:
In a large mixing bowl, use a hand mixer or a sturdy spoon to cream the softened butter, granulated sugar, and powdered sugar together. Mix until the mixture is light and fluffy—this usually takes about 2-3 minutes. It will create a lovely creamy base for your cookies!
3. Adding Eggs and Vanilla:
Next, beat in the eggs one at a time. Once they are fully combined, add the vanilla extract and mix well so the flavors meld together. Your dough will begin to take shape!
4. Mixing Dry Ingredients:
In a separate bowl, whisk together the flour, baking powder, baking soda, and salt until they are well combined. This step helps to ensure your cookies rise properly and are evenly flavored.
5. Combining Ingredients:
Gradually add your dry ingredient mixture to the wet ingredients. Mix gently until everything is fully combined and a dough forms. Don’t overmix! The dough should be soft yet not sticky.
6. Adding M&M’s:
Carefully stir in 1 1/2 cups of M&M’s. Make sure they are distributed evenly throughout the dough but be gentle; you don’t want to break the M&M’s!
7. Shaping the Cookies:
Shape the dough into rounds and place them on the prepared baking sheets. To create bunny heads, form a round base for the head and pinch two small pieces to create elongated ears at the top. Have fun with it!
8. Decorating the Bunny Faces:
Press extra M&M’s onto each bunny to decorate their faces. Think of them as eyes and nose—let your creativity shine!
9. Baking the Cookies:
Slide the baking sheets into the oven and bake the cookies for 10-12 minutes. Look for lightly golden edges while keeping the centers soft to get that perfect chewy texture.
10. Cooling Off:
Once they’re finished baking, remove the cookies from the oven and let them cool on the baking sheet for about 5 minutes. After that, transfer them to a wire rack to cool completely. This helps them set perfectly!
11. Adding Final Touches:
Using a black edible marker or black icing gel, draw small dots between the M&M eyes as bunny noses on each cookie. It adds a fun touch!
12. Time to Serve:
Your colorful Easter Bunny M&M’s Cookies are ready! Arrange them on a plate and enjoy with family and friends. Happy Easter!
Can I Use Different Types of M&M’s?
Absolutely! Feel free to use any type of M&M’s you prefer, such as peanut, crispy, or even seasonal flavors. Just keep in mind that the colors and textures might vary slightly depending on your choice!
Can I Make the Dough in Advance?
Yes, you can make the dough ahead of time! Just wrap it tightly in plastic wrap and refrigerate for up to 3 days. When you’re ready, let it sit at room temperature for about 30 minutes before shaping and baking the cookies.
How Should I Store the Cookies?
Store your cookies in an airtight container at room temperature for up to one week. For longer storage, you can freeze them for up to 3 months. Just make sure to layer them with parchment paper in between to prevent sticking!
What If My Dough Is Too Sticky?
If your dough feels too sticky, try chilling it in the refrigerator for 15-30 minutes. This helps it firm up, making it easier to shape into bunny heads. You can also sprinkle a little extra flour on your hands and work surface while shaping!